如何在 Eclipse 处理中创建 PApplet 项目
原文:https://www . geesforgeks . org/如何在 eclipse 中创建一个 papplet-project-processing/
小程序是一个小程序,不打算自己运行,而是嵌入到另一个应用程序中。小程序可以嵌入到网页中。它在网络浏览器内部运行,在客户端工作。在本文中,我们将讨论如何使用 PApplet 类在 eclipse IDE 中用 Java 创建一个小程序。
Java 中的处理库有一个名为 PApplet 的类,用于制作图形用户界面(GUI) 。在创建 applet 之前,让我们了解一下 Java applet 类的基础知识:
- PApplet 类必须是要嵌入网页或由 Java Applet Viewer 查看的 Applet 的超类。
- PApplet 类有两种主要方法,即设置()和绘制()方法。
- 设置方法运行一次,而绘制功能将重复运行,在画布上绘制图像。
- 处理使用主动模式渲染(即),所有动画任务都发生在“处理动画线程”上。
- setup()和 draw()方法由该线程处理,由事件调度线程或 EDT 触发的事件(如鼠标移动和按键)被排队,以便在 draw()方法结束时安全处理。
- 使用 PApplet 类,我们可以创建用户友好的图形用户界面应用程序,这意味着应用程序是用户交互的,它们有图标、滑块,我们可以点击、拖动、拖放和玩应用程序窗口。
示例:下面是一个了解如何用 java 创建 applet 的示例。在这个小程序中,我们正在画布上渲染图像。该图像可以来自互联网或本地电脑。众所周知,有两个函数需要定义,在每个函数中定义如下:
- setup(): 在这个功能中,我们将定义画布的大小和画布的背景。
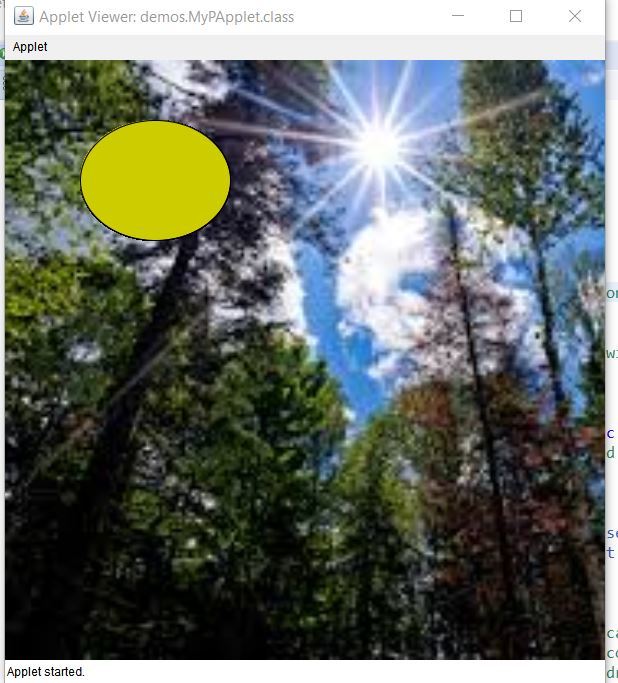
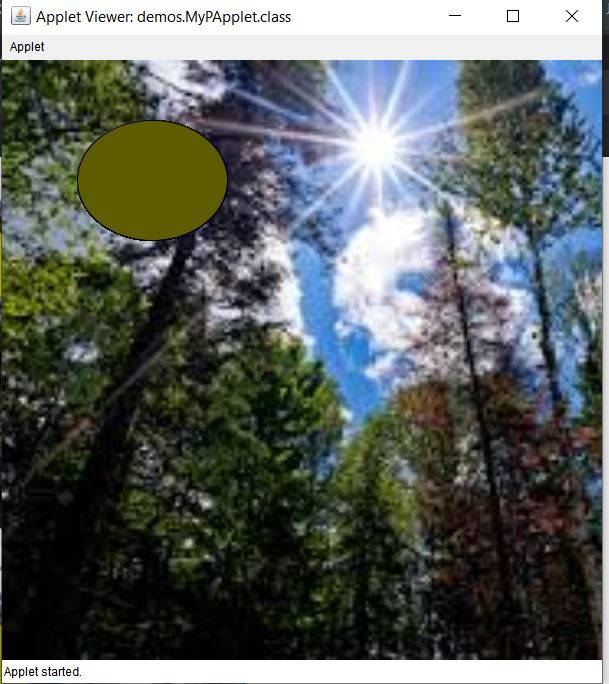
- draw(): 在这个函数中,让我们定义一个可以假设为太阳的椭圆。在这个小程序中,椭圆的颜色随着太阳颜色的变化而变化。由于可能需要几个小时来实时观察,我们将在几秒钟内改变太阳的颜色。太阳的颜色以 RGB 的形式表示。
注意:此代码在在线 IDE 上无法工作。尝试在 Eclipse IDE 上运行。
下面是上面小程序的实现:
// Java program to demonstrate
// how to create an applet

import processing.core.PApplet;
import processing.core.PImage;

// Creating a class which extends
// the PApplet class
public class MyPApplet extends PApplet {

    // Defining the image
    PImage img;

    // The setup function will run once
    // and the draw function will run
    // repeatedly drawing the image
    // on the canvas.
    public void setup()
    {
        // Set the canvas width and height
        size(500, 500);

        // Set the canvas color
        background(255);

        // Set the pen color
        stroke(0);

        // Use any image from the internet
        // or PC
        // Here, the URL of the image is given
        img
            = loadImage("https:// encrypted"
                            + "-tbn0.gstatic.com/"
                            + "images?q=tbn%3AANd9"
                            + "GcRNC9SY6P7qRIXxGcK"
                            + "vM420UXuISOlev1dOpO5"
                            + "_lHpmW2mhVQh7&usqp=CAU",
                        "jpg");

        // Resize the loaded image to
        // the full height of canvas
        img.resize(0, height);

        // Display the image
        image(img, 0, 0);
    }

    // This function is executed repeatedly
    public void draw()
    {
        // Calculate color code for the sun
        int[] color = sunColorSec(second());

        // Set the colour of the sun
        fill(color[0], color[1], color[2]);

        // Draw the sun
        ellipse(width / 4, height / 5,
                width / 4, height / 5);
    }

    // Function to return the RGB
    // color of the sun at the
    // number of seconds in the minute
    public int[] sunColorSec(float seconds)
    {
        int[] rgb = new int[3];

        // Scale the brightness of the
        // yellow based on the seconds.
        // 0 seconds is black and
        // 30 seconds is bright yellow.
        float diffFrom30
            = Math.abs(30 - seconds);

        // Assigning the ratio of
        // RGB in an array
        float ratio = diffFrom30 / 30;
        rgb[0] = (int)(255 * ratio);
        rgb[1] = (int)(255 * ratio);
        rgb[2] = 0;

        // Return the RGB
        return rgb;
    }

    // Driver code
    public static void main(String[] args)
    {

        PApplet.main(
            new String[] {
                "--present",
                "MyPApplet" });
    }
}
输出:以下是运行代码时获得的输出。颜色变化如下:

版权属于:月萌API www.moonapi.com,转载请注明出处
